The sunk-cost fallacy of prototypes

Have you ever been halfway through reading a book and decided it sucks, but also felt obligated to finish it because you read so much already? Or maybe you were halfway through watching Marvel’s Eternals, checked your watch to realize there’s still 80 mins remaining in the movie, and still hunkered down. That’s the sunk-cost fallacy in action.
Put simply, the sunk-cost fallacy is the idea that people refuse to stop doing something because they’ve already invested time and effort into it. It’s a dangerous mindset and impacts everything from relationships to learning instruments. I see it often when speaking with hardware founders, and it’s a great way to cripple your product.
In hardware-land, more and more ways are emerging to quickly prototype and prove out a product idea. That’s great! The rapid evolution of 3D printing technology has enabled folks to create high-quality plastic housings in their homes. Electronics development platforms like Raspberry Pi and Arduino have significantly lowered the bar to learning how to create custom electronics projects. Companies like Adafruit and SparkFun sell breakout boards for many components like microphones, cameras, displays, and sensors, which make integration dead simple. Code snippets are easily searchable via GitHub, and AI tools can help vibe-code firmware quickly. These are all amazing tools you should use to create working prototypes. They’re also the wrong ways to build a scalable piece of hardware.
One doesn’t simply mass-produce hardware
The most annoying thing people like to say in the hardware industry is that “hardware is hard.” It makes me feel itchy every time I hear it, but it’s true! Unlike software or apps, you can’t easily update the hardware on a device after it’s in your customers’ hands. Extra care should be taken when designing your hardware to ensure it can survive the elements and day-to-day use for years to come. Prototyping methods that allow for fast development are typically not designed for extended use by customers who can, and will, handle and use the device incorrectly.
I’m willing to bet that if you took a random device in your house and did a teardown, you’d find custom circuit boards, wire harnesses, and molded plastic components galore. Custom-designed circuit boards are a cost-effective way to connect all of your electronics components to your microcontroller without individual wires — improving reliability and reducing labor costs. Custom enclosures allow you to place all of your components in the proper locations based on your products requirements and industrial design.
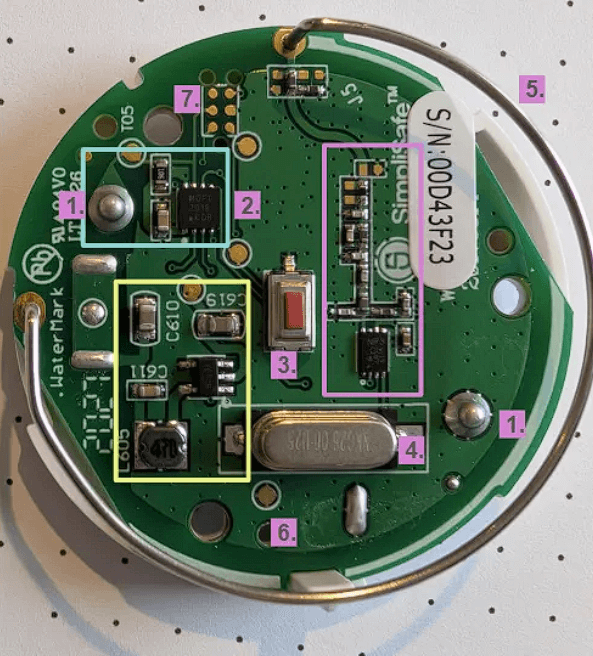
The Simplisafe Water Sensor uses two stacked custom circuit boards. No dev kits here!
Using custom-designed components takes extra upfront time and money, but allows you to mass produce with higher reliability, lower costs, and smaller form factors.
Prototyping platforms are expensive at mass production quantities
Raspberry Pi and Arduino paved the way for quick prototyping tools for electronics products. They have excellent documentation and support, a suite of compatible accessories, and a robust community of advocates online. They’re phenomenal for quickly mocking up an electronics product and understanding what works and what doesn’t. However, they’re rarely the right choice for mass-manufactured products.
These development kits tend to have ports and connections galore, which makes them handy for prototyping, but you’re paying for them regardless of if they’re used or not. If you’re using each and every connector on a Raspberry Pi, I salute you!
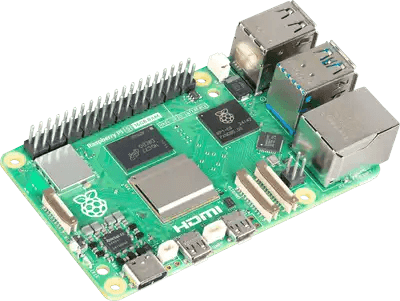
Image courtesy of Raspberry Pi
Devices like Raspberry Pi also use connectors like USB, HDMI, and ethernet ports. These connectors are designed for easy installation and removal, but can become disconnected easily if jostled or moved. I’ve worked on a project in the past that used HDMI cables to transfer data between two internal circuit boards, and it was a continuous failure point during shipping and extended use.
One of the biggest issues with using something like a Raspberry Pi or Arduino in a production device is the supply chain. During the Covid pandemic, the demand for these devices skyrocketed and the costs followed suit. Most factories in China have established vendor connections with companies that make microcontrollers and can get excellent prices. It’s far less common for them to have a connection with a supplier of a developer kit. This means you’re often having to purchase them locally from a website like Digi-Key, ship a box to a factory in China, and pay the associated tariffs and fees that surround this process. Gross.
Creating a custom circuit board allows you to choose components with more reliable and stable supply, reducing costs and risks of running out during a production run. I recommend working with established microcontroller manufacturers like Nordic, ST Micro, Fanstel, or Espressif to help determine the proper components based on your product requirements and manufacturing targets. They can help ensure you have a stable supply chain and support system for years to come.
Hobbyist programming languages can cause long-term issues
Another benefit of using development kits like Arduino is that the development environment is super user-friendly because it handles most of the low-level programming work that is tedious and difficult. This means you can create working prototypes quickly, but have limited ability to fine-tune and improve your core hardware.
Battery or Wi-Fi optimization becomes much more complicated when working with development environments designed for hobbyist and prototype projects. Similarly, you have limited debugging and programming options that make designing complicated products far more difficult.
Community-made code can also have bugs and quirks that can cause damage to the product or user if not tested properly. Relying on premade code may obfuscate these issues or make them hard to troubleshoot and fix long-term.
3D printing is great, but has its limits
3D printing is an excellent prototyping tool, but the majority of devices use injection-molded plastic housings due to their combo of low costs, excellent repeatability, and durability. I love 3D printing, and use it all the time for prototyping and development work. It’s one of the best tools available for product design engineers to visualize and test their concepts, but it’s not great for mass production.
It takes a significant investment in tooling and design to ensure you can mass produce your hardware at a reasonable price and quality. After the tooling is created, though, a factory can create hundreds or even thousands of parts in the time it may take to 3D print just one. Each part costs pennies, while a 3D print may cost ten times that, or more. The economies of scale also impact injection-molding parts far more effectively than 3D printing, giving you better pricing as you order more parts. Furthermore, 3D prints tend to be weaker in certain directions and are unable to reproduce the high-quality textures and surface finishes customers expect.
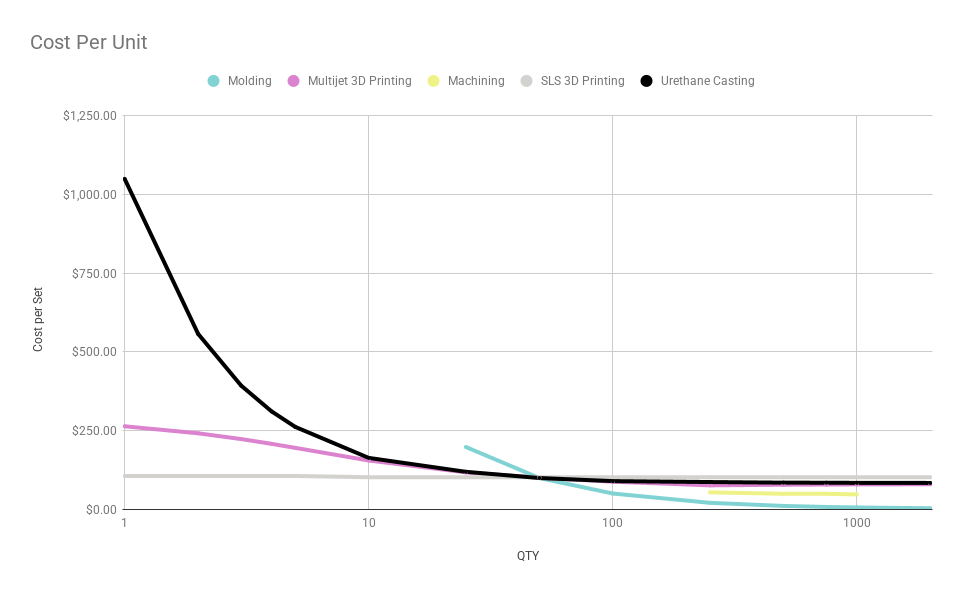
An analysis of comparing the cost per unit for various housing manufacturing methods.
While it’s possible to 3D print nearly any shape, injection molding has very strict requirements on what can and can’t be manufactured. I don’t believe I’ve received a single file from a client that was designed for 3D printing and also ready for injection molding. To prevent costly and time-consuming redesign work, I highly encourage folks to always design enclosures with an eye toward how it can be mass manufactured.
Core features and specifications for a product need to be designed into enclosures from the get-go as well. If I had a dollar for every time I was asked to “make it waterproof” at the last minute, I’d have a pontoon boat. Proper sealing features or ensuring a product can withstand drops and vibration should be factored into the initial design. Taking one step backward to redesign housings with manufacturing methods and IP ratings in mind is usually required after a prototype has validated the product works as intended.
When do you pull the bandaid off?
Prototypes are an integral part of making hardware. They’re excellent for proving out the function and use of your product and gathering feedback from beta testers. They can help you validate your business model, product architecture, and components. But you need to remember that they’re just prototypes. It’s easy to keep chugging along with your 3D-printed and hand-soldered units and try to make more and more of them. Besides, you spent so much time working on them already! This is the sunken-cost fallacy at play.
You need to remember that these prototypes have provided their value already, and it’s probably time to take a step back and do it the right way to make something cheaper and more reliable. The learnings gathered from these prototypes have been a crucial part of the process and help you change your specifications or requirements early on without investing too much time or money. Thank the prototypes for their help, put them on a shelf, and then do it right.
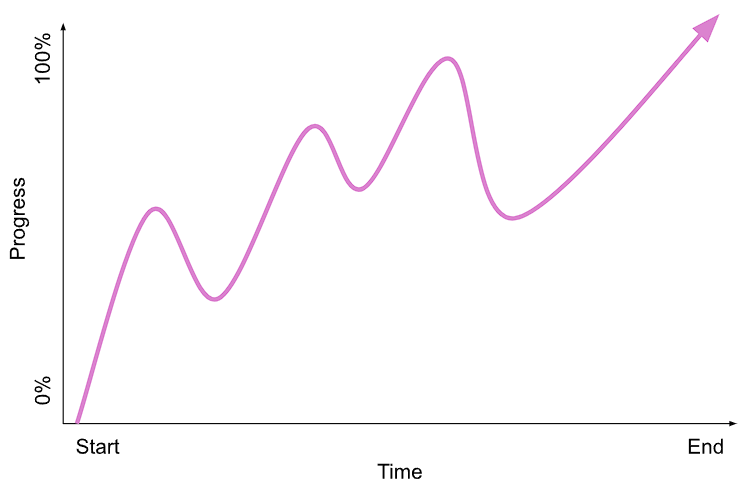
Hardware isn’t a linear march towards completion, but a lumpy, goopy curve of failures and changes and iteration. If taking a step backward now scares you, you’re in for a very rough time later.
So, when should you make the jump from prototype hardware to something more production-oriented? It depends! I know that answer sucks, but it’s true.
You need to factor in many things to determine when is the right moment to redo your hardware:
- Timeline: When do you need it done?
- Budget: Do you have money allocated for the engineering and design work? Tooling costs?
- Design: Are you happy with the current design, or do you want to make it sleeker now that you’re owning the hardware?
- Improvements: Do you want to make changes to your hardware based on the prototypes?
- Quantity: How many are you making for the first order? What are your sales forecasts looking like?
When in doubt, shoot me an email (or hit the button below) and I’d be more than happy to chat through your project and help you figure it out!