How to choose the right prototyping method
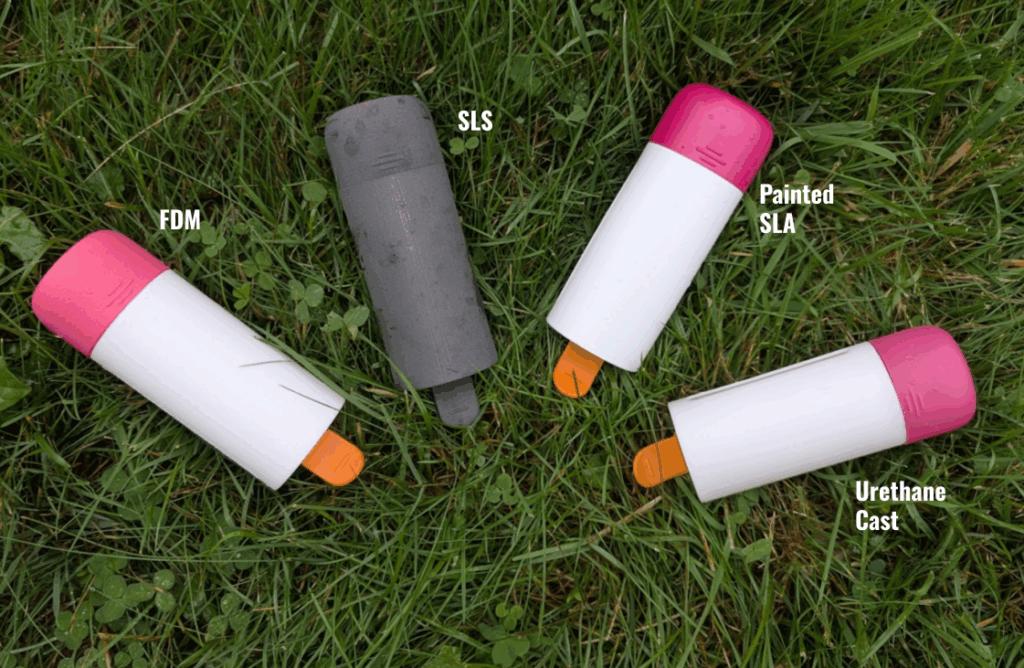
Prototypes of the Donut Hole-der
When you’re making hardware, you’re gonna need prototypes. It’s a critical part of the design and development process — nothing beats getting your hands on something IRL. Prototypes are excellent for playing with mechanisms, understanding how a product looks and feels in hand, testing the assembly and wire routing or giving it to folks to just ask “what do you think?” If you’re skipping prototyping, you’re in for a bad, bad time.
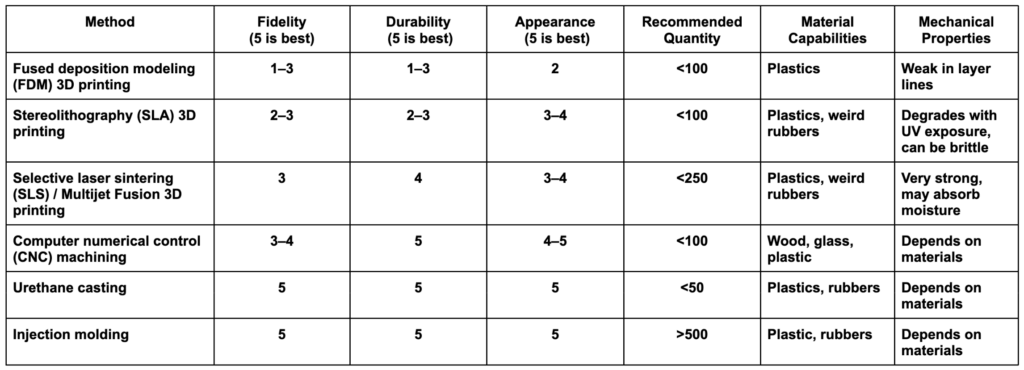
Choosing the right method for prototyping depends on some key factors. We have a deep dive of manufacturing methods and how we’ve used them to go from prototype to production. When choosing your prototype method, consider the following factors:
Fidelity: A rough prototype is great for form studies, testing ergonomics, and overall size. High-fidelity prototypes are great for parts that may be super precise or parts used for marketing purposes.
Quantity: With some handwaving and generalizing, we can say 3D prints are typically a good fit for 1–25 units or so. CNC machined parts need someone to program the machine, which has some time and costs associated. After that, CNC machining can scale pretty well. If you’re looking to make 15+ units and they need to look and perform well, I recommend urethane casting.
Material: Plastics are very easy to 3D print, CNC machine, and urethane cast. Metals typically need to be machined or 3D printed.
Durability: 3D printing methods vary drastically on how strong they are in certain directions or after being exposed to UV light. Many performance materials can be CNC machined, which gives you the most variety.
Costs: FDM 3D prints are incredibly inexpensive, while SLS and SLA are slightly more expensive. CNC machining tends to be more expensive until you’re ordering larger quantities.
Properties: Clear parts typically need to be SLA 3D printed or CNC machined. And 3D printed rubber parts typically suck and aren’t a good representation of mass manufactured options. I recommend urethane casting if you need to make rubber things.
Appearance: FDM prints tend to show artifacts from the printing process, but there are a ton of color options available. SLS prints do a better job of hiding the artifacts but have limited color options and look powdery. SLA 3D prints have limited color options as well but make parts that look close to production level. You can also paint or post process many parts to achieve a better appearance.
Here’s how I ended up using prototyping methods for my Donut Hole-der. Hopefully it helps you choose what is right for your application.
Step 1: Quick and dirty
FDM (fused deposition modeling) 3D printing rocks. The machines and materials are inexpensive and easy to use. I have 3 Bambu Lab printers at home and they are industry leading in terms of reliability, quality, and ease of use. FDM printing is perfect for quick and dirty prototypes, and I happened to find colored PLA filament that matches the Dunkin’ colorway pretty well!
I used FDM printing for the first 20ish iterations of the design, helping me tweak the mechanism and belt clip geometry. I typically will try to print 2-3 versions of the same part at the same time (either on one machine or split among all of them). This gives me three chances to nail something at once versus waiting for the next print to arrive.

FDM print of the Donut Hole-der
I also recommend only printing what you need to test and evaluate in order to move quickly. I cut away only the bottom area and trigger of the Donut Hole-der and iterated on this section a few times instead of printing the entire device. This saves a ton of time and material.
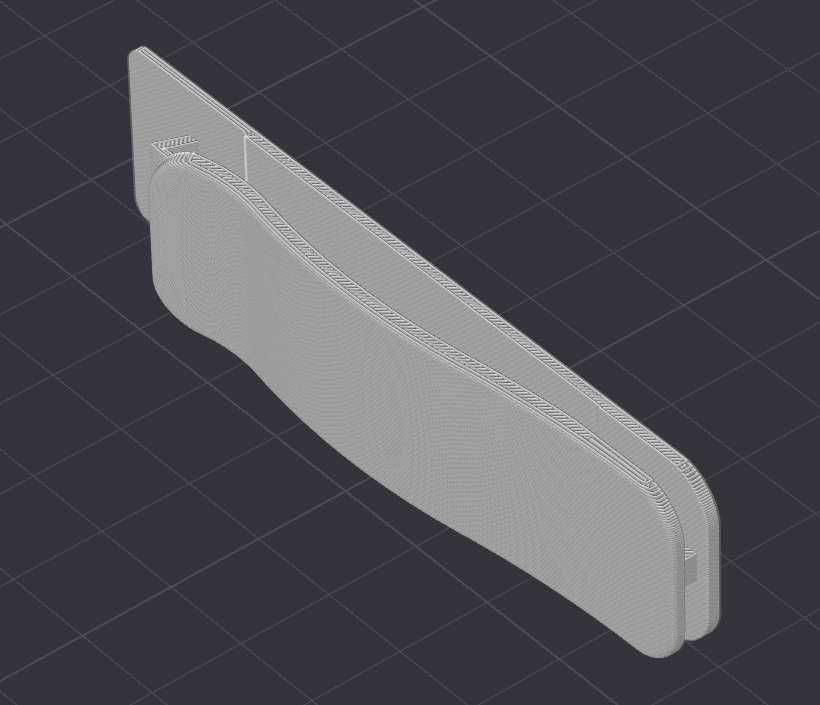
Parts need to be oriented in a specific way in order to FDM print well. FDM printers work by depositing thin layers of hot plastic on top of each other. They are very strong in the XY directions (the shapes the printer makes in a single layer) but they tend to be fairly weak in the Z direction (between layers). If you’re prototyping a snap hook, you’ll likely want to orient it so that the snap profile prints in a single XY plane, or else it’ll break off when you use it.

This 3D print, for example, would be weak where the layers are building on top of each other (1). The belt clip area would also need a lot of support material underneath so it’ll print correctly (2). Orienting the print to print on its end makes it far stronger and print faster. There are some great guides online to help you learn all of this!
FDM prints tend to show the printing layer lines, and the fit and finish leave something to be desired. They’re great for quick tests of the mechanism, showing friends and family, and filming some fun content. I would not sell these or show them to Dunkin’, however, since they look too unfinished. I was able to use in-house FDM printers to get myself to about 90% complete, which is pretty great!
Step 2: Higher fidelity
SLS and SLA printing are a step up in quality and cost from FDM printing. My quick rule of thumb is that I use SLS for anything durable and for simulating final molded parts, and I use SLA for anything that is too small of a detail for SLS or needs to be translucent.
SLS prints are my favorite types of prototypes. They’re made by melting tiny beads of plastic together with a laser, and they have a super uniform matte finish. Typically, parts are made with nylon, which means they’re durable and high performance. New advances from companies like HP have reduced the costs of prints down to be comparable with SLA. Formlabs even has a desktop-sized SLS printer you can buy if you’re feeling fancy. You can throw SLS parts at a wall and they won’t break. They flex, they snap, they just work! As a neat side effect from how the printing process works, they also don’t require separate support structures and can print interlocking parts like hinges. Appearance-wise, they’re definitely a step up from FDM prints, with far less artifacts from the print process.

SLS print of the Donut Hole-der
I’m really good at designing the correct tolerances into parts for FDM printing in my prototypes, but have less experience with SLS. As a result, the parts were a bit too loose and sloppy for my needs. I also found the Nylon dropstopper parts were more flimsy than I would have liked. The lid snapped in perfectly and felt great though! Overall, the SLS was probably not worth it here since no new findings were made with the prototype.
Similarly, I was worried about the brittleness of SLA prints and didn’t feel like the precision or surface quality was needed at this phase of work. I decided to skip SLA parts entirely for my validation phase of the prototypes, but did use them for a very cool next step – cosmetic models!
Step 3: Cosmetic models
This phase is fascinating! Oftentimes, we want to get a handful of super gorgeous prototypes for marketing or sales purposes. We don’t want to commit to injection-molded parts yet — usually due to the upfront tooling costs and associated timelines. There are a few methods for making these beautiful parts, but painted 3D prints and urethane-cast parts are my default options.
I was recently turned on to painted SLA prints by Gustavo Fontana at Fresco Design. He and his team are model-making experts, and we worked with them to get types of cosmetic models made to compare and contrast. We’ll be featuring their entire process of creating these prototypes in a future article. Needless to say, the difference in quality and appearance from my FDM prints to these prototypes is amazing.
Let’s start with the painted SLA prints. These prints need support structures to hold the parts in a specific orientation during the printing process, and the structures can leave tiny pockmarks and imperfections on the surface. Gustavo and his team know how to perfectly orient the parts and add additional material to the model to ensure the support structures are on areas that are either later removed or sanded down afterwards. Custom fixtures are used to sand the parts down to the proper geometry, and then each part is painted to match the exact Pantone colors we specified. Texture is applied afterwards with a clear coat to prevent scratching and damage. The final parts look gorgeous and vibrant! They’re a bit fragile, however, and can break or scratch if mishandled. They’re a good choice for cosmetic models if you’re in a time crunch and need parts for marketing materials like photos and videos.

SLA print of the Donut Hole-der
Lastly, let’s talk about urethane-cast parts. These are my favorite, and the process for making them is wacky and amazing.
- First, a golden sample part is made—typically using CNC machining or SLA printing. This part is hand-finished to add any texture needed.
- Then, the part is fully encased in silicone rubber until it cures solid.
- A trained operator carefully cuts the mold open and removes the part, leaving a set of silicone rubber molds.
- A measured amount of urethane is then injected into the mold, where it fills all of the empty space and is left to cure in a vacuum chamber to remove any air bubbles.
- The mold is carefully opened and the new solidified part is removed.
This process can be repeated a handful of times before the mold is damaged and needs to be made again. Typically, around 15 parts can be made in a mold.
Urethane-cast parts check almost all of the boxes for high-end prototypes:
✅ They can match any colors you need.
✅ They can match any textures you need, and the texture is usually added to the mold.
✅ They’re super precise in tolerances and dimensions.
✅ They can match the material properties of plastics and rubbers really well.
✅ They’re super durable, and can flex and be dropped without issue.
What’s not to love? Their costs are much higher than other options, and the lead times tend to be longer. But if you’re looking to make more than five cosmetic models, I highly recommend it.

Urethane-cast prototype of the Donut Hole-der
The urethane-cast parts will most closely resemble the final molded parts, but are immune to some of the defects of the injection-molding process. As a result, they’re typically the best possible version of your product you’ll ever see! I recommend using them for beta tests, units for press or influencers, and when you need to razzle dazzle.
If you’re still lost on which method to use at which stage, please don’t hesitate to reach out and chat! I love learning about new projects and helping folks figure out how to navigate this crazy world of hardware.
Additional reads:
Manufacturing methods and the dreaded middle ground of medium scale production
Going from prototype to production: hardware
informal is a freelance collective for the most talented independent professionals in hardware and hardtech. Whether you’re looking for a single contractor, a full-time employee, or an entire team of professionals to work on everything from product development to go-to-market, informal has the perfect collection of people for the job.